

With the rise of Instagram many people are more interested in taking photos of the amazing food creations that they make at home. However, as a primarily landscape photographer, this is not as simple as just holding the camera up and taking a quick shot before you dig in. In this lesson, I will take you through the steps that I took to achieve a stunning image and cinemagraph in my home in just a few minutes.
The set up

What you are looking for is a spot in your house with lots of light. This way you won’t have to invest too much into expensive strobes or lighting. You will have to find something to reflect the light back onto your subject matter.
For this, I went to the stationery store and got some large white pieces of poster board and some clips. These acted as reflectors to bounce the light onto the front of the pancakes.
Before cooking anything, I got my composition where I wanted it and made some adjustments. I increased the exposure by about a stop so that the overall image would be brighter. You can do this in lightroom later if you want.
The Shot
I was shooting with a 50mm at f/1.4 set to Aperture Priority to give me a shutter speed of 1/640 at ISO 100. The camera is on a tripod set at about a 45 degree angle and I feel that this is essential because the focus here is getting the composition right by arranging the scene in front of the camera. I was also setting out to create a cinemagraph for this and thus needed the camera to be steady as well.
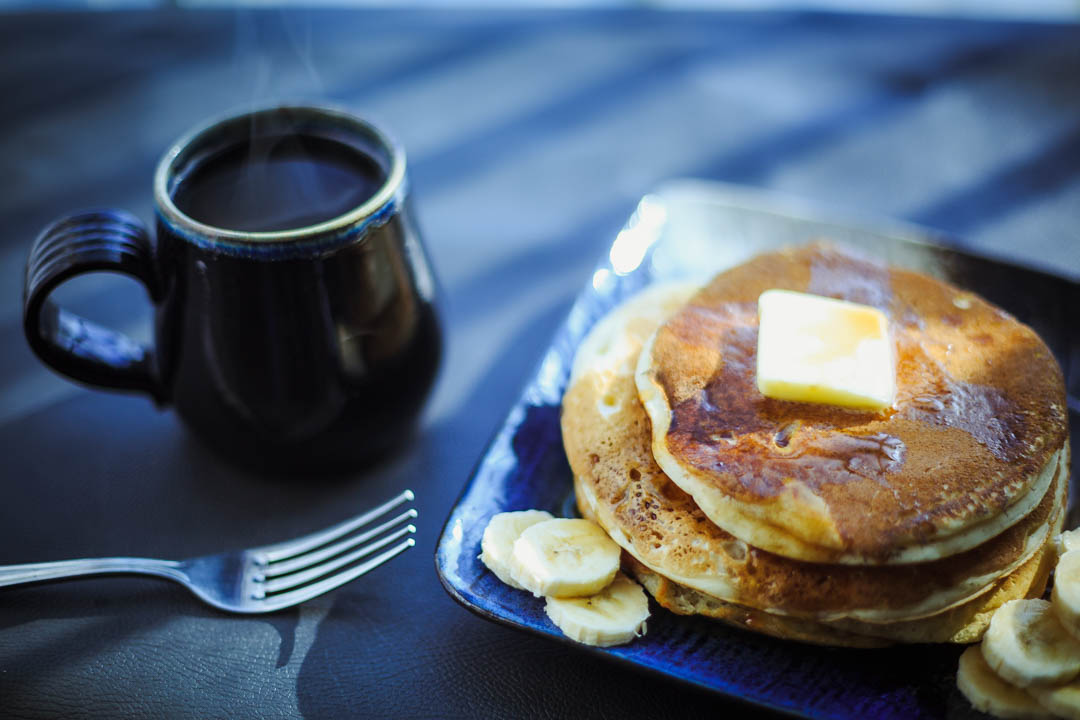
The overall composition that I was going for was to create a feeling of early morning and waking up to a hot cup of coffee and a few delicious pancakes. I wanted the light to convey that bright yet not high-noon feeling. Also note that my windows have bars on them due to the fact that I have on the 20th floor and there are safety precautions. I had to work with those shadows as well.
I took a few stills before committing to the cinemagraph. You should take a number of shots before you get the food ready to make sure everything is right as your food will cool quickly and look similar to how your Big Mac looks when it comes out of the wrapper. You know what I mean… So get everything dialed in the way that you want it and then get the food ready. You will only have a few minutes or even moments to work.
The Cinemagraph
At first I wanted to focus on the delicious maple syrup that I received in the mail from the good people at Flixel. However, After seeing how awesome the steam coming off the hot coffee looked, I changed. I wanted the focus to still be on the syrup but for the movement, I chose the steam. This helped create that tension in your brain between what should be moving and what isn’t. For me, that is the magic of a cinemagraph and it is something that you should pay attention to. That is also why I chose to shoot at f/1.4.
At this aperture, the focus is directed to the syrup and the rest is nicely blurred out. I also bumped up the exposure to about 1-stop to increase the overall brightness of the scene. For me I wanted a little more light to make this food cinemagraph a little less moody. The movement is just out of focus and that is the way that I want it. It is a subtle element that forces the eye to explore the frame. Again, you are NOT creating a looping video but a cinemagraph. Thus, creating tension between moving elements and non-moving elements is essential.
In the end, what you have there is a simple set up in your house that only requires a piece of white posterboard and natural light. The dishes and everything are ones that I have purchase and where chosen because they are unique and lack any logos. So let’s review:
- Set up in a bright spot in your house.
- Put your camera on a tripod at about a 45 degree angle.
- Set your aperture to something wide (F1.4 to 2.8 is nice) open so that your background is nicely blurred.
- Use your reflector (poster board) to bounce light onto the front of your food.
- Get everything set up and then make your food.
- Leave the plates and cups in place and then place your food after in order to keep the composition.
- Work fast as the food will start to get cold and soggy in seconds!
- When done, eat and rejoice as you edit some amazing images!
The post DIY Food Photography in Your Home appeared first on The Sajin.


Recent comments